Refresh Your Wood Fence
Your once vibrant and beautiful wood fence has now turned gray and may even be leaning, splintering, or otherwise showing its age. When left to its own devices, your wood fence will continue to deteriorate until you need a new fence installation. The good news is putting some time into refreshing your wood fence can restore its former beauty and extend its life for many years to maximize your investment. Here are the steps you can take to transform your shabby, aged wood fence back into like-new condition.
Power Wash the Fence
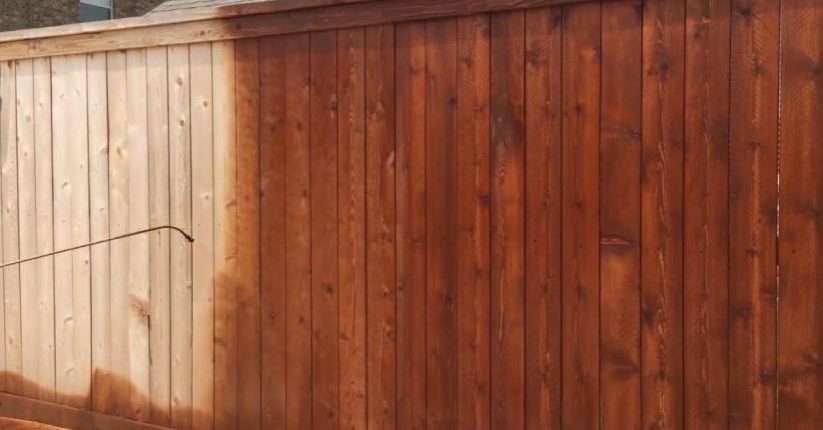
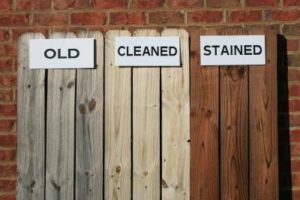
Power washing your fence is an easy and cost-effective way to dramatically improve the look of your fence. Over time, your wood fence panels and posts lose their warm color and begin to look gray and shabby. The good news is your wood is still beautiful and rich beneath the gray exterior. Power washing removes the thin surface layer of old wood to expose the beautiful fresh wood. It also removes years of grime, algae and unsightly stains on the surface of the wood. Annual power washing even helps pressure treated lumber last longer.
Power washing your fence isn’t difficult, but it should be done gently. High pressure with a narrow tip can actually cut marks into the wood. To power wash your fence, simply connect a garden hose and power washer hose to a rented power washer. Use a 15-degree or 25-degree tip on the end of the wand with a pressure that does not exceed 1800 PSI to avoid splitting the wood. Avoid renting a powerful power washer with a PSI of more than 2,000.
To use the power washer, spray the fence with the wand tip away from the surface of the wood. Swing the tip slowly across the length of the board, keeping the width of the spray aligned across your wood fence panels. As the surface is stripped, you will notice the natural color of the wood brightens. Be careful to stop stripping the wood when this color change happens. Remember that it’s better to make a few passes over the surface rather than going too deep and gouging the surface. Start with a 25- or 40-degree tip until you gain enough experience and confidence to use a 15-degree tip that’s faster but more aggressive.
Tips for Easy Fence Power Washing
These tips will help you power wash your fence like a pro without damaging the wood:
- Use a pressure of 1500 to 1800 on wood. A higher pressure can split or splinter the wood.
- Make sure you use the right tip size. Never go lower than a 15-degree tip. It’s best to start with a 25-degree with or 40-degree before moving on to the 15-degree tip.
- Hold your sprayer about 3 feet away from the fence. Swing the nozzle back and forth as you strip the top layer of wood away.
- Add a small amount of bleach to the water to treat mold and mildew.
- If you use a cleaning solution, rinse it off with clean water after a few minutes.
Seal and Stain the Wood
After power washing your fence and revealing bright new wood, it’s time to apply a sealer and stain to the wood. This can preserve and enhance the color of your fence and even extend the life of the wood.
An exterior semi-transparent oil stain is best for highlighting the natural color and grain of the wood. It also works to seal the surface of the wood with UV inhibitors that slow down sunlight bleaching. Many stains also contain a fungicide to even reduce fungal growth on the wood.
Only apply a stain to wood that has been dry for at least 24 hours. The best time to stain a wood fence is on a hot, dry day without too much humidity.
Staining vs Sealing Wood
It’s important to stain or seal your wood fence regularly. Both sealers and stains penetrate into the wood to increase its longevity and resistance to the elements. You can use some stains and sealers together but it’s usually enough to choose one or the other. Not sure which to choose?
- A sealer adds a glossy sheen to the wood and maintains its natural color. It can also be used before the wood is painted. The primary purpose of a sealer is protection.
- A stain can dramatically change the appearance of the wood by darkening the surface and changing its color. A stain can also highlight the wood’s grain.
How to Stain a Wood Fence
Don’t be intimated to stain your own fence; it isn’t that hard. The easiest way to stain the deck is with a medium nap paint roller. As you stain the wood, allow it to soak up as much stain as possible. Work in 3-foot sections at a time, brushing the stain into the wood. Add a second coat if the wood looks dry, carefully working the stain into the corners and nooks. You can use a brush to work the stain into the surface of the wood after it’s applied with the roller to make sure you get every small area.
How Often Should Wood Be Stained?
As a general rule, you should restain your fence every 2 to 4 years if you use a semi-transparent oil-based stain. When it’s time to restain the deck, you should wash the surface with a hose sprayer, using a stiff brush to remove grime, stains, and dirt. Make sure you allow the fence to dry at least 24 hours before restaining.
Perform Basic Repairs
You can expect your wood fence to require routine repairs over time. After all, the elements and changing temperatures will take their toll and make cause boards loosen, nails to protrude, and boards to split or rot. By inspecting your fence regularly and making repairs as needed, you can extend the service life of your fence by years. Here’s how to perform common fence repairs yourself without calling fencing companies for repair estimates.
Loose Boards
Fence boards become loose over time due to shifting ground and the expansion and contraction of the wood as the seasons change. This is simply a constant battle you will face when you own a fence but it’s an easy fix. You can tighten loose boards or panels by driving exterior screws into the board, recessing the screw head about 1/4″ into the surface.
Split or Broken Pieces
Has a piece of a wood panel or post broken or split? The best way to repair it is allowing the wood to dry for at least 24 hours before applying a waterproof glue to reattach the piece of wood. You can either clamp or tape the pieces together until the glue is completely dry.
Sagging Doors and Gates
Over time, you may notice your fence gates or doors sagging and becoming difficult to open. An easy solution is adding a turnbuckle, which is comprised of two to four corner braces, a turnbuckle, fittings, and a cable. This cable will run diagonally across your gate with a turnbuckle in the center. When the turnbuckle is tightened, it increases tension on the cord to lift the lower gate corner. This easy solution can be installed in 30 minutes to prevent or correct sagging.
Damage Near Vulnerable Areas
The area where posts emerge from the concrete foundation or the ground are most susceptible to rot. You can prevent premature rot and post-failure by coating the base of the posts with a wood preservative.
If you aren’t comfortable updating the look of your fence or performing repairs, fencing companies can help with cost-effective sealing, staining, and wood fence repairs to breathe fresh life into your aging fence.